You can greatly improve a portrait by removing skinimperfections. Blemishes may be natural, but theyare rarely a desirable feature in a photograph. WithPhotoshop, you can easily remove or reduce thenumber of blemishes. You can even leave some butmake them less obvious.With previous versions of Photoshop, you could usethe Clone Stamp tool or the Patch tool for this task.Photoshop CS introduced the Healing Brush, which iseven better for repairing certain skin imperfections.The Spot Healing Brush is now the simplest tool touse for removing blemishes. This tool automaticallysamples the areas around the spot to be removedand blends the pixels. The key to using the SpotHealing Brush is to choose a brush size that is justslightly larger than the blemish and to work in stageson separate layers.You can then change the opacity of each layer andmake the changes less obvious. If you do not like thechanges, you can simply discard the layers.

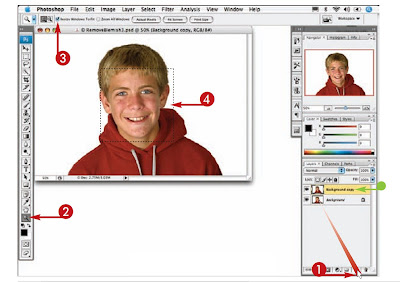
1 With the image open, drag theBackground layer over the NewLayer icon to duplicate it.
2 Click the Zoom tool.
3 Click Resize Windows To Fit.
4 Click and drag over the blemishareas to zoom in.

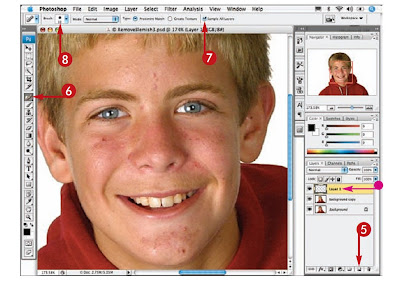
5 Click the New Layer icon to adda new blank layer.
6 Click the Spot Healing Brush.
7 Click Sample All Layers.8 Click here to open the BrushPicker.

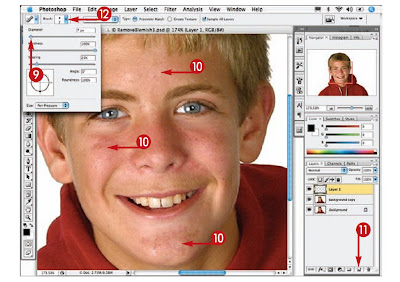
9 Click and drag the Diameterslidertoadjustthebrushsize.
10 Click each of the worstblemishesofasimilar size first.
11 Click the New Layer icon to addanother blank layer.
12 Repeat steps 8 to 10, clicking theother blemishes.

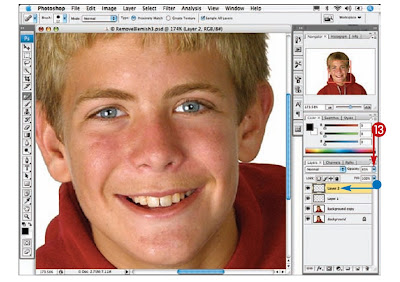
13 Click here and drag the Opacity sliderforLayer 2 to the left until the skin loonatural.
No comments:
Post a Comment