You can greatly improve every portrait in which thesubject is smiling by applying a little digital toothwhitening. Yellow teeth always dull a smile as well asthe overall look of the photo.You first select the teeth and soften the selection, toavoid a visible line between the areas that arelightened and the rest of the image. Although thereare many ways to make a selection in Photoshop,using the Quick Mask mode or the Quick Selectiontool as described in Chapter 2 works well whenmaking a detailed selection such as selecting apersons teeth.After the teeth are selected, whitening is a two-stepprocess. You have to remove the yellow and thenbrighten the teeth by adjusting the saturation. Asinthe previous tasks, duplicate the Background layeras a safety step and zoom in to make the detailedselection. Then zoom out to see the whole imagebefore adjusting the color. Digital tooth whiteningshould be a subtle adjustment to keep the smile andthe person looking natural.

1 Zoom in and make a selection ofthe teeth using the Quick Maskmode or the Quick Selectiontool.
2 Click Select Modify Feather.The Feather Selection dialog boxappears.
3 Type 1 in the Feather Radiusfield.
4 Click OK.
5 Click the Zoom tool and zoomout to see the whole image.
6 Press (Ctrl+H) to hide theselection marquee.

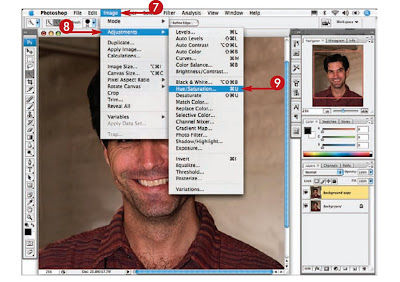
7 Click Image.
8 Click Adjustments.
9 Click Hue/Saturation.

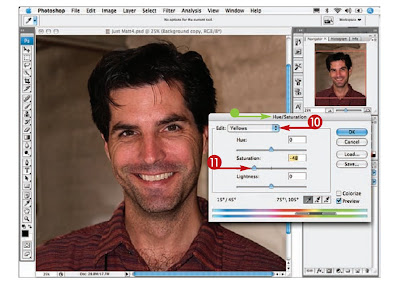
10 Click here and selectYellows.
11 Click and drag theSaturation slider slowlyto the left to removethe yellow.

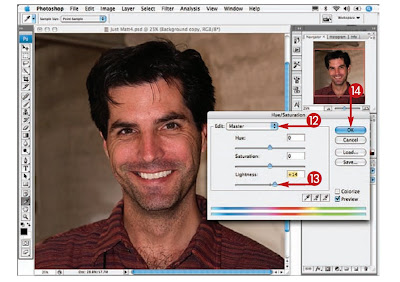
12 Click here again and select Master.
13 Click and drag the Lightness slider slowlyto the right to brighten the teeth.
14 Click OK to apply the changes.
15 Press (Ctrl+D) to deselect the teeth.
 1 Zoom in and make a selection ofthe teeth using the Quick Maskmode or the Quick Selectiontool.
 7 Click Image.
 10 Click here and selectYellows.
 12 Click here again and select Master.
No comments:
Post a Comment