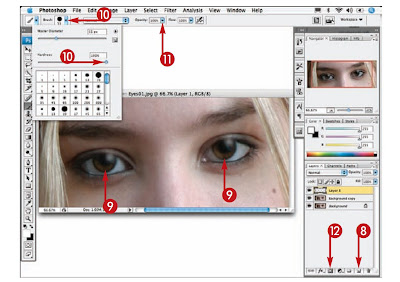
 1 With the Background layerduplicated, click the Zoom toolandzoom in on the eye area.
2 Click the Brush tool.
3 Click here and select a brushslightly larger than the final catchlight should be.
4 Click and drag the hardness sliderto 0%.
5 Click here and drag the sliderto40%.
6 Press D to reset the foregroundandbackground colors.
7 Press X to reverse the colors,making white the foreground color.
 8 Click here to add a new emptylayer.
9 Click once in each eye to createthecatch lights.
10 Click here and drag the Hardnessslider completely to the right(100%).
11 Click here and drag the slidertotheright to return the brushopacity to 100%.
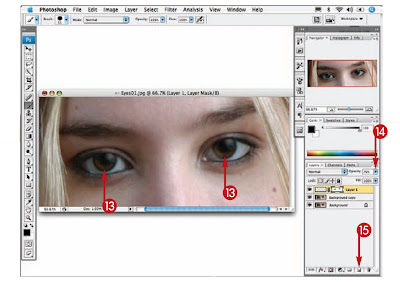
12 Click here to add a layer mask.
 13 Paint over the top ofthe catch light so that itconforms to the uppereyelid.
14 Click here and drag thelayer opacity to 70%.
15 Click the New Layerbutton to make a newempty layer.
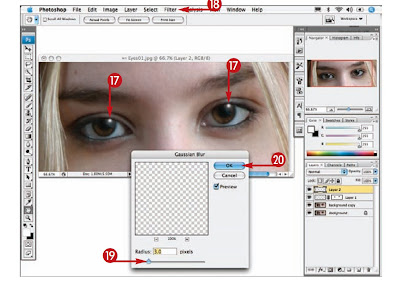
 16 Press the [ key multiple times to reduce thebrush size to about half the previous size.
17 Click once in the center of each catch light.
18 Click Filter Blur Gaussian Blur.The Gaussian Blur dialog box appears.
19 Click and drag the Radius slider between1.5 and 3 pixels to soften the edges.
20 Click OK.
1 comment:
completegraphic.blogspot.com is very informative. The article is very professionally written. I enjoy reading completegraphic.blogspot.com every day.
instant loans
online payday loans canada
Post a Comment